


Live Extreme uses web browsers like Chrome and Safari for streaming on a PC. High quality audio can be enjoyed without any special setups, however by setting computer (OS) audio device settings, you can ensure the most accurate playback of the original audio quality.
Windows 10 or later
1. When using an external audio device like a USB-DAC, first connect the device to the computer.
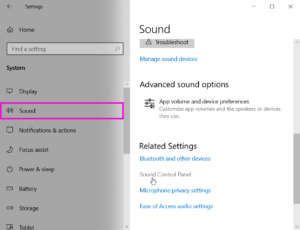
2. Open [Settings] by right-clicking the [Start] button.

3. Go to [System] → [Sound] → [Sound Control Panel]

4. Under the [Playback] tab, make sure that the “KORG WDM Audio Device” is shown. Right-click on the “KORG WDM Audio Device” and select [Set as Default Device] if it isn’t already set (if a check mark is shown on the device, this is already set).

5. Right-click on the “KORG WDM Audio Device” again, and go to [Properties].

6. From the audio quality standpoint, it is best to set the level at 100 in the [Levels] tab. If your audio device does not allow volume control, however, set the appropriate level here. Select [OK] and close the properties window.

7. Press [OK] and close the sound control panel.

8. Press the [Start] button and navigate to [KORG] → [USB Audio Device Control Panel] from the program list.

9. Select [PCM] at the Mode tab and set the Sample Rate to match the content.

1. When using an external audio device like a USB-DAC, first connect the device to the computer.
2. Open [Settings] by right-clicking the [Start] button.
3. Go to [System] → [Sound] → [Sound Control Panel]
4. Under the [Playback] tab, make sure that the “KORG 2ch 1bit Audio Device” is shown. Right-click on the “KORG 2ch 1bit Audio Device” and select [Set as Default Device] if it isn’t already set (if a check mark is shown on the device, this is already set).
5. Right-click on the “KORG 2ch 1bit Audio Device” again, and go to [Properties].

6. From the audio quality standpoint, it is best to set the level at 100 in the [Levels] tab. If your audio device does not allow volume control, however, set the appropriate level here. Select [OK] and close the properties window.
7. Press [OK] and close the sound control panel.

8. Press the [Start] button and navigate to [Windows System] → [Control Panel] from the program list.

9. Open [KORG 2ch 1bit Audio Driver].

10. Select the Sampling Rate to match the content.

1. When using an external audio device like a USB-DAC, first connect the device to the computer.
2. Open [Settings] by right-clicking the [Start] button.
3. Go to [System] → [Sound] → [Sound Control Panel]
4.Under the [Playback] tab, make sure that the “KORG Ex Audio Device” is shown. Right-click on the “KORG Ex Audio Device” and select [Set as Default Device] if it isn’t already set (if a check mark is shown on the device, this is already set).

5. Right-click on the “KORG 2ch 1bit Audio Device” again, and go to [Properties].

6. From the audio quality standpoint, it is best to set the level at 100 in the [Levels] tab. If your audio device does not allow volume control, however, set the appropriate level here. Select [OK] and close the properties window.
7. Press [OK] and close the sound control panel.

8. Press the [Start] button and navigate to [Windows System] → [Control Panel] from the program list.
9. Open [KORG Nu I Control Panel].

10. Under the [ASIO/WDM] tab, Select the SAMPLING RATE to match the content.

1. When using an external audio device like a USB-DAC, first connect the device to the computer.
2. Open [Settings] by right-clicking the [Start] button.
3. Go to [System] → [Sound] → [Sound Control Panel]
4.Under the [Playback] tab, make sure that your audio device is shown. Right-click on your device and select [Set as Default Device] if it isn’t already set (if a check mark is shown on the device, this is already set).

5. Right-click on your playback device again, and go to [Properties].

6. From the audio quality standpoint, it is best to set the level at 100 in the [Levels] tab. If your audio device does not allow volume control, however, set the appropriate level here. Select [OK] and close the properties window.

7. Under [Default Format] in the [Advanced] tab , select the following formats.
A. Number of channels: 2 channel
B. Bit depth: select large bit depth like 24 bit or 32 bit
C. Sample rate: select the sample rate to match the content.

For certain audio devices, you may not see the [Advanced] tab or the sample rate settings. In these cases, use the dedicated setup application for the device from the control panel and set the sample rate. For more details, please contact the device’s manufacturer.
8. Press [OK] and close the properties window.

9. Press [OK] and close the sound control panel.

macOS
1. When using an external audio device like a USB-DAC, first connect the device to the computer.
2. Go to [Applications] [Utilities] [Audio MIDI Setup].


3. Right-click on your device and select [Use This Device for Sound Output]. When selected, a speaker icon will appear.

4. Under [Format] in the [Output] tab , select the following formats.
A. Number of channels: 2 channel
B. Bit depth: select large bit depth like 24 bit or 32 bit
C. Sample rate: select the sample rate to match the content.


5. From the audio quality standpoint, it is best to set the Channel Volume at 1.0. If your audio device does not allow volume control, however, set the appropriate level here.

6. If the Finder icon is shown on your playback device, it is best to right-click other output such as [Built-in Output] and select [Play Alerts and Sound Effects Through This Device].

