


Live Extreme uses web browsers like Chrome and Safari for streaming on a PC. Lossless or hi-res audio can be enjoyed without special settings. However, the following computer OS settings need to be set for surround audio playback.
5.1ch / 7.1ch surround
1. Connect a PC to an HDMI supported device such as an AV receiver.
2. From the [Start] button, go to [Windows System] – [Control Panel]. Open [Sound] settings. Right-click on your device from (1) and select [Set as Default Device].

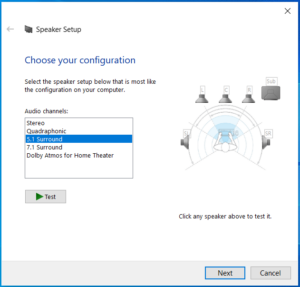
3. Click on [Configure] at the bottom left and select a surround sound setting, 5.1 Surround or 7.1 Surround, that best matches your system. Click [Next] and complete the speaker configuration setting.

4. Go back to the [Sound Settings] window from (2) and click [Properties] at the bottom right. Under [Default Format] in the [Advanced] tab, select the sample rate that matches the content (and select the largest bit depth). For example, for 48kHz streams, select [24bit, 48000Hz] and click [OK].

5. On the player page, click on the [♪] symbol in order to select a surround audio stream and enjoy the content.

1. Connect a Mac to an HDMI supported device such as an AV receiver. If your Mac has no HDMI port, an HDMI adapter is needed (see the links below). It is highly recommended to use Apple’s official/certified products especially for hi-res and surround sound playback.
Belkin 4K Mini DisplayPort to HDMI Adapter
USB-C Digital AV Multiport Adapter
The following adapters allow 7.1ch (max.) surround playback on iPhone and iPad (via Safari).
Lightning – Digital AV Adapter
USB-C Digital AV Multiport Adapter (for USB-C iPad)
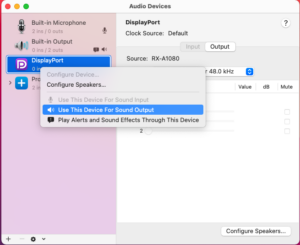
2. Go to [Applications] > [Utilities] > [Audio MIDI Setup] and open the [Audio Device] setting window. (If the Audio Device window is hidden, go to [Window] in the menu bar at the top of the screen and click [Show Audio Device].)

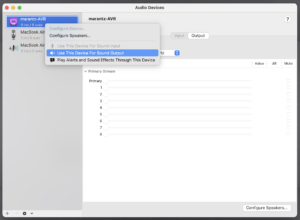
3. Make sure that the device from (1) is shown on the left side. Right-click on the device and select [Use This Device for Sound Output].
4. Under [Format] in the [Output] tab, select the settings that best match the output device and the content format.
・Channel Number : Select the number of speakers connected to your output device.
・Bit Depth : Select the largest possible bit depth.
・Sample Rate : Select the identical sample rate to the content.
※ Note: HDMI ports on Apple Silicon (M1) Macs only support 48kHz output (April 2023).

5. Click [Configure Speakers…] on the bottom right. From the [Configuration] pull-down menu, select a speaker configuration that best matches your system, such as stereo or 5.1 surround.
※ If your system is based on ITU 7.1ch, select 7.1 Rear Surround instead of 7.1 Surround.

6. Make sure that the channel number shown in the bottom half of the window is in the ascending order from 1~8. If the channel number is unselected or not ordered correctly, set the right channel from the pull-down menu.
7. Click [Apply] and complete the setup.
8. On the player page, click on the [♪] symbol in order to select a surround audio stream and enjoy the content.
AURO-3D
1. Connect a PC to an HDMI supported AV receiver. On the AV receiver, select the Auro-3D mode.
2. From the [Start] button, go to [Windows System] – [Control Panel]. Open [Sound] settings. Right-click on your device from (1) and select [Set as Default Device].

3. Click on [Configure] at the bottom left and select a surround sound setting, 5.1 Surround or 7.1 Surround, that best matches your system. Click [Next] and complete the speaker configuration setting.
4. Go back to the [Sound Settings] window from (2) and click [Properties] at the bottom right. Under [Default Format] in the [Advanced] tab, select the sample rate that matches the content (and select the largest bit depth). For example, for 48kHz streams, select [24bit, 48000Hz] and click [OK].

5.Set the level to 100 in the [Levels] tab.
6. Set the player volume to the maximum level and enjoy the content.

1. Connect a Mac to an HDMI supported device such as an AV receiver. If your Mac has no HDMI port, an HDMI adapter is needed (see the links below). It is highly recommended to use Apple’s official/certified products especially for hi-res and surround sound playback.
Belkin 4K Mini DisplayPort to HDMI Adapter
USB-C Digital AV Multiport Adapter
2. On the AV receiver, select the Auro-3D mode.
3. Go to [Applications] > [Utilities] > [Audio MIDI Setup] and open the [Audio Device] setting window. (If the Audio Device window is hidden, go to [Window] in the menu bar at the top of the screen and click [Show Audio Device].)
4. Make sure that the device from (1) is shown on the left side. Right-click on the device and select [Use This Device for Sound Output].
5. Set all of the channel volume to the maximum 1.0.
6. Under [Format] in the [Output] tab, select the settings that best match the output device and the content format.
・Channel Number : Select the number of speakers connected to your output device.
・Bit Depth : Select the largest possible bit depth.
・Sample Rate : Select the identical sample rate to the content.
※ Note: HDMI ports on Apple Silicon (M1) Macs only support 48kHz output (April 2023).

7. Click [Configure Speakers…] on the bottom right. From the [Configuration] pull-down menu, select a speaker configuration that best matches your system, such as stereo or 5.1 surround.
※ If your system is based on ITU 7.1ch, select 7.1 Rear Surround instead of 7.1 Surround.

8. Make sure that the channel number shown in the bottom half of the window is in the ascending order from 1~8. If the channel number is unselected or not ordered correctly, set the right channel from the pull-down menu.
9. Click [Apply] and complete the setup.
10. Set the player volume to the maximum level and enjoy the content.
Dolby Atmos
Dolby Atmos content can be played on the Edge browser on Windows 10 or newer Windows systems.
※Web browsers other than Edge are not compatible.
Preparation
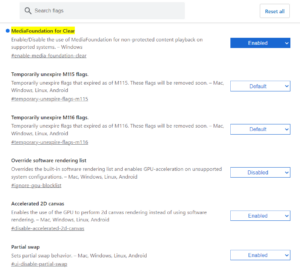
1. On Edge, copy and paste “edge://flags/#enable-media-foundation-clear” *1 in the URL input box and hit enter. Change the “MediaFoundation for Clear” to “Enabled” and restart the browser.
*1 On older versions, try “edge://flags/#edge-mf-clear-playback-win10”
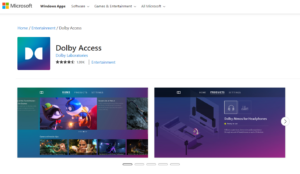
2. Install “Dolby Access” application from this page.*2
If you wish to use regular headphones *3 for Dolby Atmos playback, you need to purchase the Dolby Atmos Headphone license. For home theater use, you can enjoy Dolby Atmos content for free.
*2 PCs that are sold as Dolby Atmos compatible may already have this application installed.
*3 Headphones that are sold as Dolby Atmos Headphones may not need this license.
HDMI Device Playback
1. Connect a PC to an HDMI device that supports Dolby Atmos such as an AV receiver and turn on the device.
2. Start the “Dolby Access” application. Go to the “Products” tab and select the home theater icon. Then click “Setup”.
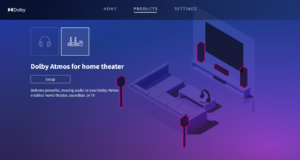
3.Click “Continue” in the home theater setup page and set up the connected device.
4. Open the Edge browser and enjoy Dolby Atmos content.
Headphone Playback
1. Connect headphones to a PC headphone output.
2. Set up headphone output with the “Dolby Access” application and enjoy Dolby Atmos content on the Edge browser.
PC Built-in Speaker Playback
※Built-in speaker playback is only supported on Dolby Atmos compatible PC models.
1. Open the Edge browser and enjoy Dolby Atmos content on a compatible PC device.
The following devices support Dolby Atmos playback on the Safari browser.
Built-in Speaker
・Supported models : 2018 or newer MacBook series (MacBook Pro, MacBook Air)
Headphone Playback
Dolby Atmos playback is supported on head-tracking supported headphones only.
※ Normal headphones cannot play Dolby Atmos. (Downmix stereo will be played.)
・Supported models : Mac with Apple Silicon
・Supported headphones : Apple AirPods Pro / Max / 3rd Gen, Beats Fit Pro
※ HDMI or USB output is not supported on macOS for Dolby Atmos.
The following devices support Dolby Atmos playback on the Safari browser.
Built-in Speaker
Supported Models
・iPhone XS series
・iPhone XR
・iPhone 11 or newer
※ With built-in speakers, orient the device horizontally (landscape mode) for better playback.
Headphone Playback
Dolby Atmos playback is supported on head-tracking supported headphones only.
※ Normal headphones cannot play Dolby Atmos. (Downmix stereo will be played.)
Supported Models
・iPhone SE (2nd gen)
・iPhone XS series
・iPhone XR
・iPhone 11 or newer
・2018 or newer iPad (including Pro, Mini, and Air)
Supported Headphones
・Apple AirPods Pro / Max / 3rd Gen, Beats Fit Pro
Built-in speaker and headphone playback are only supported on Dolby Atmos compatible Android devices.
1. On an Android device, go to settings and search “dolby”. Then turn on “Dolby Atmos (or Dolby Sound)”.

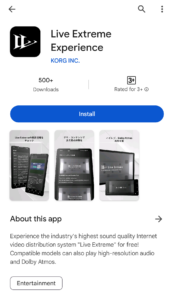
2. Install “Live Extreme Experience for Android” from Google Play.
3. Open the Chrome browser and enjoy Dolby Atmos content. (Live Extreme Experience for Android will automatically open and content will start playing.)
※ With built-in speakers, orient the device horizontally (landscape mode) for better playback.
Dolby Atmos Tested Android Devices
Dolby Atmos playback is supported with Apple TV 4K (all gens) from the HDMI output.
1. Connect Apple TV to a Dolby Atmos supported device.
2. Turn on Dolby Atmos from “Setting > Video and Audio > Audio Format > Dolby Atmos”.

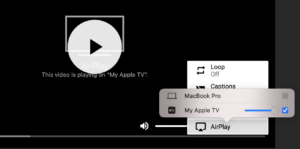
3. Open Dolby Atmos content on Mac, iPhone, or iPad on the Safari browser and make sure that the device is on the same network as your Apple TV.
4. Select your Apple TV from the AirPlay button and enjoy the content.
The following devices support Dolby Atmos playback with their HDMI output.
・Chromecast, Chromecast Ultra
・Chromecast with Google TV
Chromecast Ultra
1. Connect Chromecast to a Dolby Atmos supported device such as an AV receiver.
2. Go to Chromecast device settings from the “Google Home” application on an iPhone or Android.
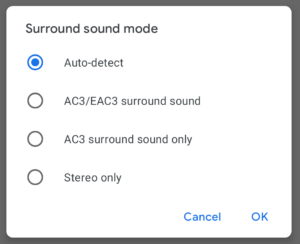
3. Select “auto-detect” or “AC3/EAC3 surround sound” from the “Sound settings > Surround sound” setting menu.
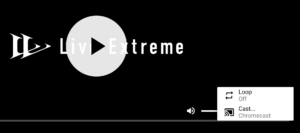
4. Open Dolby Atmos content on Windows, Mac or Android on the Chrome browser and make sure that the device is on the same network as your Chromecast.
5. Select your Chromecast device from the cast menu and enjoy the content.
Chromecast with Google TV
1. Connect your Chromecast with Google TV to a Dolby Atmos supported device such as an AV receiver.
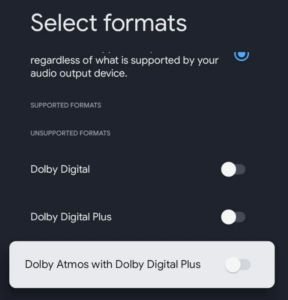
2. Select “Automatic” or “Manual > Dolby Atmos in Dolby Digital Plus” from the “Advanced sound settings > Format selection” setting menu.
3. Open Dolby Atmos content on Windows, Mac or Android on the Chrome browser and make sure that the device is on the same network as your Chromecast.
4. Select your Chromecast device from the cast menu and enjoy the content.